Document templating using HTML
Create dynamic PDFs from a simple HTML template
ConvertAPI document generator allows you to automate the dynamic document creation using a simple HTML template as a baseline for the document and inject data into the template using a JSON object. Not only it allows you to populate the document with plain-text data, but also embed images, conditionally render or hide sections of the document, iterate over dynamic data arrays, and much more!
The HTML template can be created programatically from a scratch, or using MS Word with no coding skills at all. Simply set up a DOCX document based on your needs and convert it to HTML using our DOCX to HTML converter. All you need to do is to add the placeholder tags where you want your dynamic data to appear in the document.
It can be used for many different occasions, for example, automated invoices, gift cards, vouchers, certificates, application forms, charts, reports, etc. The generated documents can be output in PDF, PNG or JPEG formats.
Interactive demo
Let's see how simple it actually is to use it. In this example, we will generate a PDF that contains a guest list. It includes a dynamically rendered list of data as well as plain-text data on the parent object.
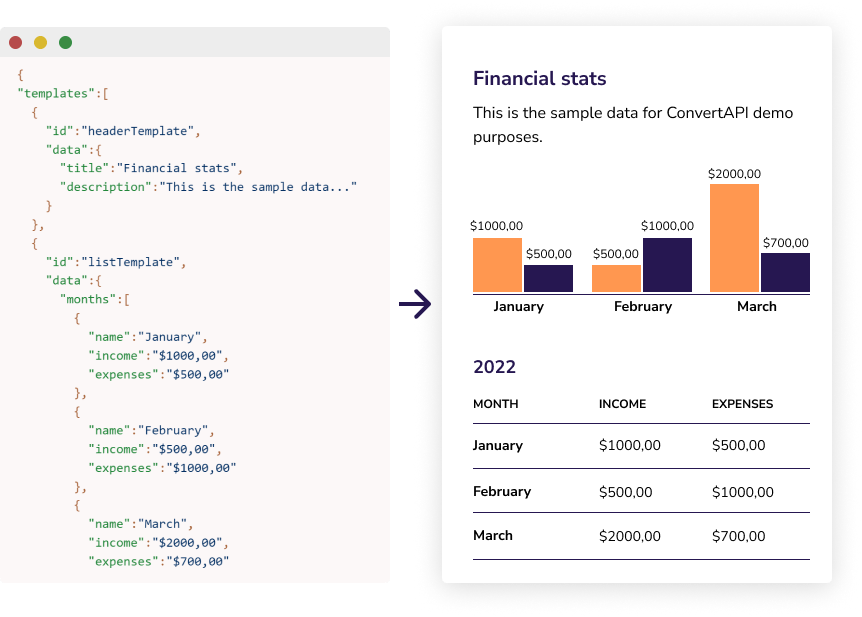
On the left-hand side, we set up a simple HTML template used to style your document. On right, the JSON with data is present. The HTML template and the JSON object are the main components for document generation.
You can modify the HTML template to see how it works. Play around with the JSON and pass your custom data in here. It will be injected into the HTML template above and merged into the final document.
1HTML template
2 JSON model
Please Sign In or Sign up for free in order to test API request.
Once you have these components ready, all you need to do is make an HTTP request:
3 Send HTML template and JSON model to ConvertAPI
 fetch('https://template.convertapi.com', {
   method: 'POST',
   body: jsonModel
 })
 .then(r => r.json()).then(o => {
   // do something with o.Files[0].Url
   console.log(o.Files[0].Url)
 })
And voila! You have your PDF document ready. In this example, we used Vanilla JavaScript to make an HTTP request, but surely you can do this with any programming language of your choice. A complete code example can be found on CodeSanbox.
Advanced techniques
Inlined and hosted HTML templatesThe HTML template can be passed as a URL of a file hosted on a server or as inlined HTML string included in the JSON object. The inlined HTML can be seen in the code example above. Alternatively, if you would like to pass a URL of the file, simply set the "url" property at the top level of the JSON model (instead of the "html" one). If you keep both "html" and "url" props, the "url" will overwrite the HTML.
Images, styles and scriptsAssets used in the template can be either inlined into the HTML itself (images encoded as Base64, inlined styles and scripts, etc.) or hosted on the web. However, the inlined approach is preferred because it ensures the best performance and consistency as it is self-contained and not dependent on third-party impact. Any scripts included in the HTML will also be accepted and executed prior to the document generation.
Templating features and syntaxThe dynamic data is injected into the HTML template using the {{ mustache }} syntax. It allows you to inject data into the template, iterate the array of data, and create conditional blocks of content using keywords like "#if", "#unless", "#each", "#with", etc. We strongly recommend you go through the wonderful Handlebars documentation to see a full range of options to manipulate your data.
Output formatsYou can switch between the output formats: PDF, JPEG or PNG. To set the desired format, simply specify the "format" property at the top level of the JSON model (next to the HTML template). The default is PDF.
Advanced parametersTo get the most of this particular conversion, you can apply parameters that are present on the HTML to PDF converter. All of these parameters can be injected into the "Parameters" section of the JSON model.
Conclusion
It is super simple to create documents with dynamic data using HTML templates. ConvertAPI provides the option to set up flexible and feature-rich dynamic PDF documents or JPEG and PNG images. Semantic templating using the {{ mustache }} syntax gives you plenty of possibilities, and the only limitation is your imagination!